Thursday, May 28, 2009

Slots of Fun Challenge & Kristina's Color Challenge #51

This one just asked to use the sketch below. I chose to combine it with Kristina Werner's Color Inspiration Challenge #51 - I took the sketch very literally but have seen some great variations (check out Angie Tiemen's blog for her take with buttons replacing the two vertical panels). I normally don't have color problems ever since my light box creation, but for some reason on this one the So Saffron Brads look Kiwi Kiss-ish and the More Mustard designer paper looks Pumpkin Pie-ish. Bizzaro-for sure!


Stamps: Darling Dots (hostess set)
Ink: VersaMark
Paper: More Mustard Patterns (retired hostess) & Walk in the Park Designer Series Papers, Sahara Sand, Baja Breeze, & So Saffron card stock
Accessories: Chit Chat Rub-ons, Whisper White Narrow Grosgrain Ribbon, So Saffron brads, White Embossing Powder, Paper Snips, Stampin' Dimensionals, Signo white gel pen

Wednesday, May 27, 2009

Hitting the Tables Challenge

Here's my 2nd entry for VSN! The challenge was to use only red, black and white. I needed some thank you cards so I made 2 (sent one, kept one). I love Ruby Red so it was a great chance to really showcase that beautiful shade of red - not too bright, not too dull, not too dark...anyway, onto this simple card


Stamps: Central Park, Thank You Kindly
Ink: Ruby Red, Basic Black, VersaMark
Paper: Whisper White, Ruby Red, Basic Black card stock
Accessories: Whisper White Taffeta Ribbon, Scallop Edge Punch, White Embossing Powder

Tuesday, May 26, 2009

Non-traditional Wedding Card

So if you follow the lovely Angie Tieman you'll notice that she's been posting different challenges from Splitcoaststampers Virtual Stamp Night (VSN). I posted them in my gallery over at SCS (my SCS name is sarahbe492) so if you want to see them all now head there - otherwise I'll be posting one per day!

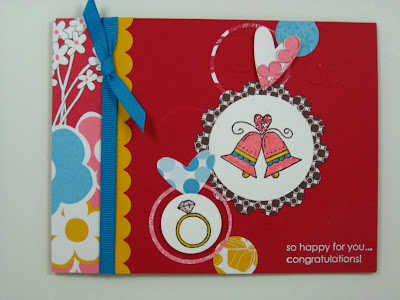
The first challenge (one is posted every hour - you have 45 minutes to complete it and then 15 minutes for clean up if you participate while it is going on (Friday night and Saturday - but uploads are due Monday so you can do them out of order or on Sunday as well) was to make a non-traditional wedding card. The challenge hostess specifically said she wanted bright, bold colors with a quirky style. Here's mine:


Stamps: Goody Goody Gumdrops (Hostess set)
Ink: Chocolate Chip Craft Ink, Stampin' Write Markers
Paper: Real Red & Summer Sun card stock, Pink Flamingo & Chocolate Chip Patterns Designer Series Papers
Accessories: Tempting Turquoise Narrow Grosgrain Ribbon, Circle Punches, Heart to Heart Punch, Pennant XL Bigz Die (Circle Scallop), Big Shot die cutting machine, Light Box, Punches Plus Template, Embossing Stylus, Dazzling Diamonds glitter, Stampin' Dimensionals, Two Way Glue Pen

Sunday, May 17, 2009

Easter Cards!

Here are a few cards I made for family for Easter!!!

This one was a workshop card for March. I used Pale Plum, Sage Shadow, Chocolate Chip, and Very Vanilla. I completely CASEd the card from my upline Beth from a shoebox swap we had, just changed out the Pretty in Pink from her card to Pale Plum. The thumping technique was used with the markers.


Stamps: Thoughts & Prayers, All Holidays
Ink: Chocolate Chip Classic Stampin' Pad, Chocolate Chip, Close to Cocoa, and Creamy Caramel Stampin' Write Markers
Card stock: Pale Plum, Sage Shadow, Very Vanilla, Chocolate Chip
Accessories: Chocolate Chip Narrow Grosgrain Ribbon, Designer Label Punch, Photo Corner Punch, SU! Texturz Plates, Big Shot, Mat Pack, Stampin' Dimensionals, Stampin' Sponges

On this one I used an awesome stencil - I have a pic of what it looked like before I assembled the elements on top of it and after. So simple to do - I put the stencil down and used a sponge dauber with the same color Classic Ink as the card stock (So Saffron).


Stamps: Thoughts & Prayers, All Holidays
Ink: Mellow Moss Classic Ink Pad, Mellow Moss, Blush Blossom, So Saffron, and Almost Amythyst Stampin' Write Markers
Card Stock: Mellow Moss, Blush Blossom, So Saffron, Almost Amythyst, Whisper White
Accessories: Whisper White Organza Ribbon, Small Kind Thoughts Stencil, Scallop Edge Punch, Scallop Oval Punch, Large Oval Punch, Sponge Dauber, Stampin' Dimensionals

Well ta-ta for now! I participated in a couple of Splitcoaststampers' Virtual Stamping Night (VSN) challenges so I'll be back with those soon!

Thursday, May 7, 2009

Stamp a Stack "Fun Folds & Terrific Techniques

Here are 4 of the 5 cards we made at my last Stamp a Stack! It was during Sale-a-Bration so some of the stamps and ribbon are no longer available but I'll show them to you as I'm sure you could adapt them with current supplies! The 5th card was one using the free SAB Designer Paper, similar to this card using the Pennant XL Bigz Die and the Big Shot. Well SAB is over, but remember that for the entire month of May, when you purchase any combination of textured card stock or Designer Series paper, you get ONE package (any price) FREE!

JOY FOLD & FAUX SILK TECHNIQUE (also Rock & Roll on closure medallion)


Stamps: Baroque Motifs, Warm Words (I also used the stamp from Eastern Blooms which is exactly like the Baroque Motifs flower stamp so my attendees didn't have to worry about switching ink colors)
Ink: Rose Red, Kiwi Kiss, More Mustard, Chocolate Chip Classic Stampin' Pads
Paper: Rose Red, Kiwi Kiss, Chocolate Chip, Whisper White card stock, More Mustard Designer Series Paper (from retired hostess pack)
Accessories: Tissue Paper, Chocolate Chip Narrow Grosgrain Ribbon, Glue Stick, SU! Texturz Plates, Big Shot, Scallop Circle Punch, 1-3/8" Circle Punch, Stampin' Dimensionals

POCKET CARD FOLD & BLEACHING TECHNIQUE


Stamps: Fifth Avenue Floral, Sweet Little Sentiments (current hostess set)
Ink: So Saffron, Old Olive, Sage Shadow, Chocolate Chip Classic Stampin' Pads
Card stock: So Saffron, Old Olive, Sage Shadow, Chocolate Chip, Whisper White
Accessories: Bleach, paper towels, So Saffron Sale-a-Bration Wide Grosgrain Ribbon, Silver brads, Round Tab Punch

BETH FOLD & FAUX LINEN TECHNIQUE
This one takes a bit of explanation & I'll try and take pictures of the fold sometime. You cut a piece of cardstock (here kraft) to 8-1/2" by 5-1/2" and score it at 4-1/4". Then you cut from that score line to the upper left hand corner to make the diagonal part. The inside piece (here Really Rust) is a piece of card stock cut at 10-1/2" by 4" and scored at 5-1/4". It is adhered to the full part of the kraft cardstock so when you open it you open the diagonal craft piece to the left and the Really Rust piece upwards. It sounds strange but if you try it with my measurements I think you'll get it easily! I call it the Beth fold because my fabulous upline Beth introduced me to it! She said it wasn't her original idea but didn't know where it came from - if you know let me know, maybe that person has a name for it. Perhaps the "over and up fold"...if you have name ideas for it let me know!


Stamps: Inspired by Nature, All Holidays, En Francais Background
Ink: VersaMark, Really Rust, Baja Breeze, Close to Cocoa Classic Stampin' Pads
Card stock: Glossy card stock, Kraft, Baja Breeze, Really Rust, Whisper White
Accessories: Sand paper, Chocolate Chip Narrow Grosgrain, Designer Label Punch, 1" Circle Punch, Small Oval Punch, Stampin' Sponges, Stampin' Dimensionals

Z FOLD & GLITTER WINDOW TECHNIQUE


Stamps: Polka Dot Punches (Sale-a-Bration set), Wow Flowers
Ink: Not Quite Navy, Baja Breeze Classic Stampin' Pads
Paper: Urban Garden Designer Series Paper, Not Quite Navy, Kiwi Kiss, Baja Breeze, Basic Grey, Whisper White card stock
Accessories: Duct Tape, Kiwi Kiss Striped Grosgrain Ribbon, Scallop Edge Punch, Scallop Circle Punch, 1-1/4" Circle Punch, Double Rectangle Punch, Word Window Punch, Dazzling Diamonds Glitter, Mat Pack

Friday, April 17, 2009

Walk in the Park Designer Paper Class


Hello again! Here's the 2nd sample for my upcoming class. See this post for all details. This card is again by Martha Town (she designed the amazing samples for this class - just a perk of being a SU! demonstrator - it is on the SU! website). Although Martha's samples only use the gorgeous In-Color Baja Breeze for card bases, we'll be using the other gorgeous colors that are in the Walk in the Park DSP as well - So Saffron, Basic Gray, Kiwi Kiss, Cameo Coral, and Baja Breeze! Did I mention how much I LOVE this paper? I cannot wait to scrapbook with it!!! (If you order the products, you will have PLENTY left over to use for more cards or scrapbook pages!!!)

Note: I will be only precutting the card bases (and SCORING - so important to have a clean crisp fold) and the DSP 6x6 squares for those who just choose the $15 class, so you'll be able to choose which card you do which way and with what paper. Remember I'm including full color instructions as well!!! Bring a paper trimmer and your fav adhesive!!!

***I MUST have both nofication of your intent on coming to the class and payment to order supplies by Wednesday, April 22nd!!! Don't delay, as spots are limited! :) I hope to see you there - we will have such fun stamping these simple and easily reproducible cards (those are the best kind as I know you probably have busy lives like mine)!!!***

Have a fab weekend! I'm up in Nebraska spending the weekend with my niece and nephew!!! So FUN!!! :)

Monday, April 13, 2009

Card Class with Products!!!


Hello all! Here's a peek at just one of the cards attendees of my May Card Class will make (Card designed by Martha Town). I am going to hold my first product-based class on Tuesday, May 12th at 6:30 pm. Attendees will need to pre-order the Oval All Stamp Set ($16.95), coordinating Scallop Oval Punch ($15.95) and Walk in the Park Designer Series Paper ($9.95). The total for these items is $42.85, or with Shipping & Handling and Tax, $49.12. Also, with the April "Get Connected" promotion every $40 Mini Catalog purchase you'll receive any product on page 208 ("Under $10" page) ABSOLUTELY FREE!!! I LOVE these products and I know you will too! Pictures of all the products are below this post!

The total cost for this class is $50, including the 4 products (a possible $52.80 value) and 5 cards we will be making that evening. The money is due by Wednesday, April 22nd so the items are sure to arrive by the class date! Ribbon, corduroy buttons/brads, ink pads, cardstock, envelopes, and glue sticks will all be provided!!! You need to bring a paper cutter and your favorite adhesive (especially if you're not a glue stick gal)! (If you'd like to add on a SNAIL or Dotto Adhesive from SU! to your order let me know. You could also add on a pack of Basic Gray cardstock (40 sheets) and a Basic Gray ink pad to make 80 cards at home with your supplies - just over 80 cents/card.)

The best part is: not only are all your projects basically free but you'll also take home a versatile stamp set, punch, and almost a full pack of 12x12 beautiful double sided designer paper, as well as your FREE "Under $10" item (I LOVE the Mini Note kits!!!) and 5 simple cards (with full color instructions)!

***For those of you who may just want to make the cards, the class would include 6" x 6" sheets of each of the designs in the Walk in the Park designer paper (whatever you don't use is yours to take home - 6 different double sided sheets) as well as 3 pieces of the Basic Gray Curduroy Buttons (Page 6 of the Mini Catalog - you would get one of each piece). The cost for this class is $15 but remember that you won't get to take the stamp set and punch home with you then! :(

Without further ado, the fabulous products (Have I mentioned that I LOVE this mini catalog?)


The "Under $10" items (each class participant that purchases the Oval All stamp set, Scallop Oval punch and Walk in the Park DSP chooses 1 free):


EVERYONE attending will receive one of each of the following buttons:


Contact me today at scrappinNstampin@yahoo.com to reserve your spot and get your payment to me (either class option needs to be paid by April 22nd)! It will be a great time and I will draw for the ink pad of the winner's choice that night ($15 class participants get 1 ticket into the drawing and $50 class participants will recieve 3 tickets into the drawing).

***Notice to out of towners: I am offering the class as a kit by mail so tack on $5 to ship it to you and you will have full color instructions accompanying the pieces to make these beautiful cards. I am not able to stamp images and send them to you (against Stampin' Up! policy) so if you choose the $15 class ($20 with shipping), you will get the cardstock, six 6x6 sheets of the Walk in the Park DSP, 3 corduroy buttons and enough ribbon to complete the projects. I will mail the kits the week of May 11th.

***Notice to those unable to attend: You have the same options as the out of towners but will obviously not have to pay the shipping and handling. I will deliver the kits to you the week of May 11th.

Wednesday, April 8, 2009

DIY Photo Tent/Light Box

Before Light Box


After Light Box


I've been wanting a photo tent for a long time, but not really willing to invest. I found on someone else's blog (sorry I don't know who) that they'd used this DIY tutorial to make a light box out of foam core board. I'm loving the difference it has made in my photos already - although I perfected taking photos on a ledge in my basement, the colors are more true and I get a perfect picture the first time every time.

The card above was designed by my fab sideline Kelly for the new catalog shoebox swap we had in January using the stamp set Just Buzzin' By, Candy Lane Designer Series paper, Pretty in Pink 1/4" Grosgrain Ribbon, Pink Pirouette Cardstock, Scallop Edge Punch, Heart to Heart Punch, Dazzling Diamonds glitter, Jet Black Staz-On, So Saffron Stampin' Write Marker, Stamp-a-ma-jig and Two Way Glue Pen. See my swap cards for this event at this post.

Here is the other card she designed (taken in my basement before the light box). This one uses the Top Note Die, Dreams du Jour stamp set, Chocolate Chip 1/4" Grosgrain Ribbon, Urban Garden Designer Series Paper, Baja Breeze and Chocolate Chip card stock, VersaMark and Chocolate Chip ink, Felt Fusion Too, Stampin' Dimensionals, and Stamp-a-ma-jig.


Here is my favorite card from the swap!!! My awesome upline, Beth designed this one - one of the reasons I love it so much is that it combines two of my favorite stamp sets: Inspired by Nature and the En Francais background stamp. Tip: Either brayer on the ink or rub your ink pad then tap on it all over to get the entire background stamp inked. Then lay the background stamp rubber up, put your card stock on top with a piece of scratch paper over the top and rub. I've had great results with this method!!! Now for the supplies: Riding Hood Red, Very Vanilla, and Basic Black card stock, Cutter Kit (to distress the edges), Basic Black 1/4" Grosgrain Ribbon, Whisper White Taffeta Ribbon (used a sponge dauber to rub on a bit of Creamy Caramel ink), Basic Black and Creamy Caramel Ink, Stampin' Sponges, Wide Oval Punch, and Gold Brads.


Beth's other swap used a great product - the embosslit!!! It dry embosses and die cuts at the same time. Specific products are the Sweetest Stem embosslit (exclusive to Stampin' Up) and the coordinating Sweet Stems stamp set, Jet Black Staz-On and Baja Breeze Classic Ink, Aquapainter, Urban Garden Designer Series paper, Baja Breeze, Basic Gray and Whisper White card stock, Basic Black 1/4" Grosgrain Ribbon, and Stampin' Dimensionals.


I love these ladies, their creativity and how much I look forward to any get togethers we are able to plan!!! Have a wonderful day!

Monday, April 6, 2009

Kristina Werner's Color Challenge #48


I cannot believe it has been so long since I have posted...aaaahhh! Life has been so crazy lately. I'm hoping to change that soon though - today I joined a group of Splitcoast Stampers that all want to post more regularly to their blogs and support each other through comments - so hopefully that'll help me.

First of all, I want to say that this was quite the challenge as I combined Kristina's Color Challenge with AmyR's Friday Sketch #54 (not this weeks sketch but a great one for this stamp set).

I really enjoyed making this card - can you believe it was the first time I inked up Trendy Trees? Such a great great stamp set with 2 super useful sentiments. However I did not use the sentiments - I made it a night of firsts by breaking into my Chit Chat Rubons. My dh ordered the rubons for me as an extra bonus when he ordered the set of Bold Brights Classic Stampin' Pads that I so desperately wanted for Christmas.

I'd like to try to include more measurements (as well as recipes):
1) Cut Baja Breeze card stock in half (through the middle of the long side) so that your piece measures 5 1/2" x 8 1/2". Score it at 4 1/4"
2) Cut 3 pieces of Chocolate Chip Patterns Designer Series Paper at 1 1/2" x 3 1/4". Adhere 2 pieces 1/4" from the top and sides and the middle piece will be centered between them (1/4" margins on the left and right as well as the top for the middle piece too).
3) Cut Whisper White card stock at 1 7/8" x 4 3/4" and stamp tree trunks in Chocolate Chip Classic Ink. Use a Stamp-a-ma-jig to line up the tree tops and stamp them in Kiwi Kiss and Baja Breeze Classic Inks. (Optional: Use a torn post it note to mask off where you want to sponge the grass in Kiwi Kiss Classic Ink.)
4) Cut a layer of Chocolate Chip card stock at 2" x 4 7/8" and Baja Breeze card stock at 2 1/4" x 5 1/8". Sponge Chocolate Chip Classic ink on the edges of the Baja Breeze.
5) Apply chosen Chit Chat rubon (there are so many to choose from in both chocolate and white! - although you could also stamp a sentiment in the same area) in the lower right hand corner.
6) Use white taffeta ribbon to tie a bow around the card.

See ya later chickadees! I'm hopefully going to churn out Dawn McVey's challenge for this week tonight so I'll be back! :)

Saturday, February 14, 2009

PTI Color Challenge


Hello everybody! Papertrey Ink's big release is tonight and you may expect contraband stamps(non SU! stuff) on this blog soon thereafter. I MUST have Dawn McVey's first PTI release Damask Designs. Anyway Nichole Heady is giving away 4 of Dawn's sets, 2 at Dawn's blog for commenting and 2 at her blog for making a card before the official release (midnight eastern) with one of Dawn's unique color combinations from her 18 cards using Damask Designs. Here's my card copying her color combo of kraft, dark chocolate, raspberry fizz, and vintage cream (I translated into SU! colors kraft, chocolate chip, pink passion, and very vanilla). I am so loving my BRAND NEW set, Fifth Avenue Floral as well as Elegant Cheer (not new to the SU! catalog but new to me).

Anyway have a great night! Cross your fingers for my hopes of winning!!!